Ubuntu 22.04 Jammy Jellyfish
0. Introduction
For production using official Debian packages.
1. Requirements
- A supported Linux server
- A public domain name from a registrar and top level domain you trust.
In order to run an official Aleph.im Compute Resource Node (CRN), you will also need the following resources:
- CPU (2 options):
- Min. 8 cores / 16 threads, 3.0 ghz+ CPU (gaming CPU for fast boot-up of microVMs)
- Min. 12 core / 24 threads, 2.4ghz+ CPU (datacenter CPU for multiple concurrent loads)
- RAM: 64GB
- STORAGE: 1TB (NVMe SSD preferred, datacenter fast HDD possible under conditions, you’ll want a big and fast cache)
- BANDWIDTH: Minimum of 500 MB/s
You will need a public domain name with access to add TXT and wildcard records.
💡 This documentation will use the invalid
vm.example.orgdomain name. Replace it when needed.
2. Installation
Run the following commands:
First install the VM-Connector using Docker:
sudo apt update
sudo apt upgrade
sudo apt install -y docker.io
docker run -d -p 127.0.0.1:4021:4021/tcp --restart=always --name vm-connector alephim/vm-connector:alpha
Then install the VM-Supervisor using the official Debian package. The procedure is similar for updates.
sudo wget -P /opt https://github.com/aleph-im/aleph-vm/releases/download/0.4.1/aleph-vm.ubuntu-22.04.deb
sudo apt install /opt/aleph-vm.ubuntu-22.04.deb
Reboot if required (new kernel, ...).
Configuration
Hostname
Update the configuration in /etc/aleph-vm/supervisor.env using your favourite editor.
You will want to insert your domain name in the form of:
Network configuration
The network configuration is detected automatically.
The default network interface is detected automatically from the IP routes. You can configure the default interface manually instead by adding:
(don't forget to replaceenp0s1 with the name of your default network interface).
You can configure the DNS resolver manually by using one of the following options:
💡 You can instead specify the DNS resolvers used by the VMs using
ALEPH_VM_DNS_NAMESERVERS=["1.2.3.4", "5.6.7.8"].
Volumes and partitions
Two directories are used to store data from the network:
- /var/lib/aleph/vm contains all the execution and persistent data.
- /var/cache/aleph/vm contains data downloaded from the network.
These two directories must be stored on the same partition. That partition must meet the minimum requirements specified for a CRN.
💡 This is required due to the software using hard links to optimize performance and disk usage.
Applying changes
Finally, restart the service:
3. Reverse Proxy
We document how to use Caddy as a reverse proxy since it manages and renews HTTPS certificates automatically.
Any other reverse-proxy (Nginx, HAProxy, Apache2, ...) should do the job as well, just make sure to renew the HTTPS/TLS certificates on time.
First, create a domain name that points to the server on IPv4 (A) and IPv6 (AAAA).
This is a simple configuration. For more options, check CONFIGURE_CADDY.
Again, run these commands as root:
sudo apt install -y debian-keyring debian-archive-keyring apt-transport-https
curl -1sLf 'https://dl.cloudsmith.io/public/caddy/stable/gpg.key' | sudo gpg --dearmor -o /usr/share/keyrings/caddy-stable-archive-keyring.gpg
curl -1sLf 'https://dl.cloudsmith.io/public/caddy/stable/debian.deb.txt' | sudo tee /etc/apt/sources.list.d/caddy-stable.list
sudo apt update
sudo apt install caddy
Then, after replacing the domain vm.example.org with your own, use configure Caddy:
sudo cat >/etc/caddy/Caddyfile <<EOL
{
    https_port 443
    on_demand_tls {
        interval 60s
        burst    5
    }
}
vm.example.org:443 {
    reverse_proxy http://127.0.0.1:4020 {
        # Forward Host header to the backend
        header_up Host {host}
    }
}
EOL
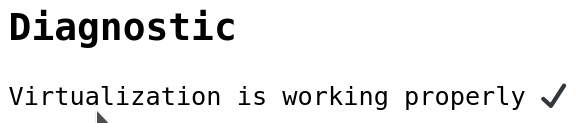
4. Test
Open https://[YOUR DOMAIN] in a web browser, wait for diagnostic to complete and look for
If you face an issue, check the logs of the different services for errors:
VM-Supervisor:
Caddy:
VM-Connector:
Common errors
"Network interface eth0 does not exist"
Did you update the configuration file /etc/aleph-vm/supervisor.env with ALEPH_VM_NETWORK_INTERFACE equal to
the default network interface of your server ?
"Aleph Connector unavailable"
Investigate the installation of the VM-Connector using Docker in step 2.